
Tutorial Part 1 - Materials
Materials required for making your own Felt Woven Picnic Basket includes:
1) Felt Fabrics
~ Color: Dark Brown
~ Size: 29" x 29" x 3 pcs
2) Cardboard
~ Weight: 180gsm-200gsm
~ Size: A4 x 2 pcs
3) Threads
~ Color: Dark brown (or same color as fabric)
: Beige (or same color as velcro)
4) Velcro
~ Size: 2cm x 1.5cm
5) Stitches used
~ Whip stitch
Proceed to Part 2 for Cutting & Preparation.
DIY Felt Woven Picnic Basket
Wednesday, November 12, 2008
DIY Felt Woven Picnic Basket
Tutorial Part 2 - Cutting & Preparing
 T2-1: Cut out the felt fabrics for the FRONT and BACK of your basket.
 T2-2: Cut out the felt fabrics for the SIDES of your basket.
 T2-3: Cut out the felt fabrics for the 2 FLAPS of your basket.
 T2-4: Cut out the felt fabrics for the BASE of your basket.
 T2-5: Cut out the CARDBOARDS for your basket.
 T2-6: Cut out the felt fabrics & cardboard for the HANDLE of your basket.
 T2-7: Cut out the felt fabrics and velcro for the BUCKLE of your basket.
Proceed to Part 3 for weaving & sewing of the basket.
DIY Felt Woven Picnic Basket
Tutorial Part 3 - Sewing
 T3-1: Sew the strips (short) onto the basket front piece by piece.
 T3-2: Finish sewing all 29 pieces of the strips on.
(Hint: Just remove or add on the strips accordingly if you have cut them too thick or too thin.)
 T3-3: This is how it'll look like from the back.
 T3-4: Lift up all the even number strips as shown.
 T3-5: Place one strip (long) across the basket as shown.
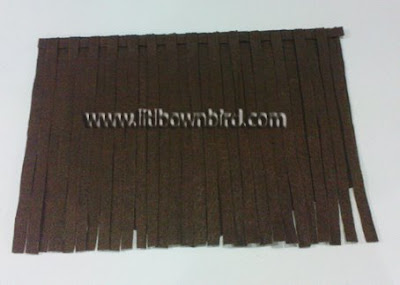 T3-6: Put the even number strips down.
 T3-7: Lift up all the odd number strips.
 T3-8: Place another strip across.
 T3-9: Put the strips down.
 T3-10: Lift up all the even number strips again.
 T3-11: Place another strip across.
 T3-12: Put the even number strips down.
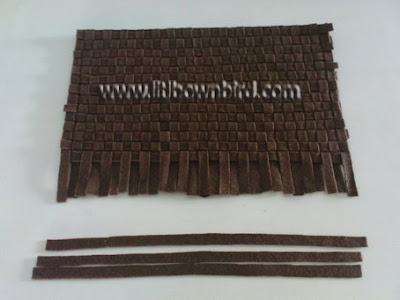 T3-13: Repeat the same steps until you left the last 3 strips.
 T3-14: Trim off all uneven fabrics at both sides.
 T3-15: Then stitch up both sides.
 T3-16: This is how your basket looks like at this stage.
 T3-17: Turn the basket over.
 T3-18: Insert the front cardboard in as shown.
 T3-19: Turn your basket over & continue weaving lifting strip by strip alternately.
 T3-20: Finish weaving the remaining 3 strips.
 T3-21: Turn over to the back.
 T3-22: Trim away the excess fabrics as shown.
 T3-23: Turn your basket over to the front.
 T3-24: Stitch the opening close.
 T3-25: The front of your basket is finished! (Repeat the same for the back of the basket).
 T3-26: Next sew the strips onto the side of the basket.
 T3-27: Finish sewing the strips as shown.
(Hints: Just remove or add on the strips accordingly if you have cut them too thick or too thin.)
 T3-28: Lift up all the odd number strips.
 T3-29: Place one strip across.
 T3-30: Put the strips down.
 T3-31: Lift up all the even number strips.
 T3-32: Place another strip across.
 T3-33: Put down the strips.
 T3-34: Lift up the odd number strips again.
 T3-35: Place another strip across.
 T3-36: Put the strips down.
 T3-37: Repeat the same till you reached the bottom.
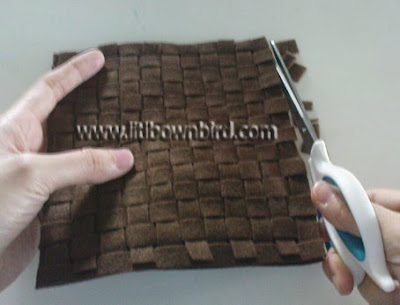 T3-38: Trim off the uneven fabrics (if any).
 T3-39: Stitch the sides together leaving one side open.
 T3-40: Insert the cardboard from the opening.
 T3-41: Seal up the opening.
 T3-42: The side of your basket is finished!
 T3-43: Repeat the same for the other side of the basket as well as the two flaps.
(Note: They are all of the same size.)
 T3-44: Next put the two pieces of the basket base together and sew the 3 sides together leaving one side open. (refer to next step).
 T3-45: Insert the cardboard in.
 T3-46: Then seal up the opening.
 T3-47: Next place the front, back, sides & base of the basket as shown above.
 T3-48: And sew them together accordingly to above format.
 T3-49: This is how your basket will look like at this stage.
 T3-50: Next join and sew all 4 sides of the basket together as shown.
 T3-51: The body of your basket is completed!
 T3-52: Sew the two pieces of the flaps buckle together.
 T3-53: Sew the velcro onto one side of the buckle as shown.
 T3-54: Next sew it onto the front of one of the flaps with the velcro facing down & outwards.
(Note: Sew it onto the shorter side).
 T3-55: This is how the back should look like.
 T3-56: Sew the flap onto the basket as shown.
 T3-57: Sew the other flap onto the other side.
 T3-58: Measure 7cm from the ends of the handle (cardboard) and make a marking.
 T3-59: Fold both sides down where the markings are.
 T3-60: Stitch the ends of two pieces of the handles together.
 T3-61: Repeat the same for the other six pieces till you get four long pieces.
 T3-62: Pin two pieces of the handle onto cardboard overlapping each other as shown.
 T3-63: Turn over and cross the two pieces as shown.
(Note: Be weary of the pin all the time so as not to hurt yourself)
 T3-64: Turn over and cross the two pieces again.
(Note: Always overlap in the same direction. ie. the right piece always on top of the left)
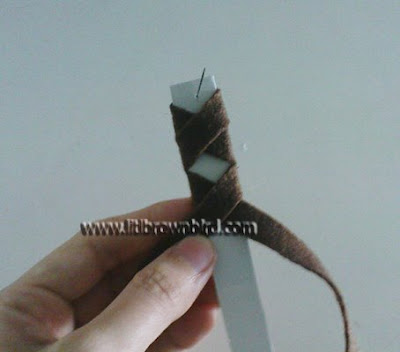 T3-65: Turn over & cross the fabrics again.
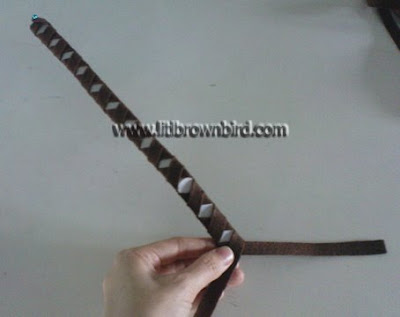 T3-66: Repeat the same till you reach the end of the cardboard.
 T3-67: Secure the fabrics with another pin.
 T3-68: Next place the other two pieces overlapping each other on the other side.
(Note: Through the same pin that is already on the end of the cardboard).
 T3-69: Turn over & cross the fabrics on each other again.
 T3-70: Turn over & do the same again.
 T3-71: Repeat the same till you reached the end.
 T3-72: Trim off excess fabrics.
 T3-73: Fasten & sew the fabrics together for both ends.
 T3-74: Bend the handle at both sides (where you have previously folded).
 T3-75: Sew both ends of the handles onto both sides of the basket as shown.
 T3-76: And your Felt Woven Picnic Basket is completed!!
 Prepare your favorite food and it's time for a great picnic!!
 My baby girl with some of my felt creations.
Proceed to Part 4 for the Cut-out Patterns.
Subscribe to:
Posts (Atom)